Camera
Adobe Camera Raw vs. Olympus Workspace: Which app should you use?

Did you receive a brand-new Olympus camera over the holidays? If so, chances are good that the next addition to your photographic toolbox will be a Raw processor from the likes of Adobe, Capture One, DxO or one of their many rivals. But is payware or even subscriptionware software really necessary, when Olympus provides its own software free of charge with your camera purchase?
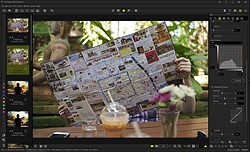
| Olympus Workspace version 1.4’s user interface. |
In this article, we’ll compare the company’s Olympus Workspace Raw processing application with its well-entrenched payware rival, Adobe Camera Raw, whose algorithms also underlie the company’s popular Lightroom Classic application. As in previous articles in this series, I’m limiting myself only to image editing in the interests of keeping things to a readable length, and won’t address features like image management, tethering or printing.
The ground rules
This comparison is based upon the most recent versions of each application at the time of writing. For Adobe, that’s Camera Raw 13.1.1 and Bridge 11.0. For Olympus, it’s Workspace 1.4. My computer is a 2018 Dell XPS 15 9570 laptop running Windows 10 version 1909.
To ensure neither Adobe nor Olympus had any advantage out of the gate, I’ve aimed to reproduce, as closely as possible, the look of already-processed images from our galleries, without any prior knowledge as to the recipes behind them.
 |
| Adobe Camera Raw version 13.1.1’s user interface. |
I’ve chosen images from the Olympus E-M1 Mark II for use in this comparison, as it was the most recent model for which we had sufficient comparison images already prepared, and its launch price and resolution are broadly similar to those of the cameras used in my previous manufacturer software comparisons.
Sharpness and noise reduction were left at their default settings to avoid overcomplicating things, while lens corrections were enabled for both applications. Images processed in ACR were saved at JPEG quality 11, just as used in our galleries. For Olympus Workspace, which offers a choice of just three different compression levels, I used the maximum ‘Super Fine’ quality.
The main differences
Of course, the most immediately obvious differences between ACR and Olympus Workspace are their camera support and price-tag. You already paid for Workspace when you bought your Olympus camera, so it’s effectively free. While it only supports Raws shot by the company’s own cameras, you can expect full Raw support for every Olympus camera to be available pretty much immediately upon release.


Download the full ACR image here; the full Workspace image here.
Photo by Carey Rose
By contrast, ACR comes with a recurring subscription fee. It supports a vast range of cameras from many manufacturers, including every single interchangeable-lens Olympus camera made to date, as well as many fixed lens models. If your camera supports Raw capture, ACR can almost certainly handle it, but that support can sometimes take a while to arrive after the release of new models. It’s also more limited sometimes than first-party software, especially for older models.
For example, while Adobe offers ‘camera matching’ profiles for all of Olympus’ Micro Four Thirds ILCs and Stylus compacts, it’s not available for any of the company’s Four Thirds DSLRs except the E-5. Nor is it provided for Camedia, SP- or XZ-series fixed-lens cameras.
A clean, modern interface and database storage of edits
Olympus Workspace is a relatively new offering that first launched in early 2019 alongside the sports-oriented E-M1X, so it’s perhaps not surprising that it’s pretty clean and modern, aesthetically speaking. And unlike some rivals, it doesn’t make the mistake of storing your edits in your original files, nor does it scatter sidecar files all over your drives. Instead, all edits are stored in a single database whose location you can control.


Download the full ACR image here; the full Workspace image here.
Photo by Carey Rose
Workspace has a non-modal design and is pretty customizable in terms of its layout, which is liberally sprinkled with unlabeled icons. For most the meaning is obvious, but some are a bit opaque, although a description is usually shown if you hover the mouse pointer above them. There’s also an excellent, in-depth PDF user manual linked from the Help menu.
High-res 4K screens, touchscreens and pens work well for the most part, though there are quirks
You can’t directly edit Workspace’s keyboard shortcuts, but you can choose from a few different preconfigured shortcut groups for some of the more commonly-used options. Most editing controls are grouped in an editing palette that, by default, sits at the right of the screen. It has a tabbed design and individual sections under each tab can be opened or closed at once. If you leave many open together, though, you can find yourself doing a lot of scrolling in search of controls.
Multiple monitors are supported, allowing you to view your image full-screen on one monitor while adjusting controls or browsing thumbnails on the other. You can also compare and edit two different images side-by-side, a feature most competitors lack. High-res 4K screens, touch-screens / pens also work well for the most part, although there are some quirks.


Download the full ACR image here; the full Workspace image here.
Photo by Carey Rose
The UI can sometimes prove rather quirky, though
If you have multiple displays of differing resolution and you drag panels between them, the correct per-screen scaling factor is forgotten and the panels can be unusably large or small. And adjusting sliders is easier with a mouse instead of touch or pen input, because you have to double-tap on the slider with a pen or your fingertip before you can make your adjustment.
In most apps, if an adjustment isn’t available you’d expect it to be grayed out, but Workspace doesn’t do so
Nor are those the only strange UI choices. For example, preset white balance can be adjusted on a magenta-green axis with a fixed step size, yet auto white balance is instead adjusted on a green-magenta axis and its slider moves smoothly, rather than in steps. Yet even though it moves smoothly, positions in between the steps don’t affect the white balance at all, meaning you can have two images with seemingly different adjustments that are nevertheless 100% identical.
Even more confusingly, the contrast slider might have absolutely zero effect if the Gradation control is active and set to anything other than normal gradation. In most apps, if an adjustment isn’t available you’d expect it to be grayed out, but not in Workspace. With all of that said, Olympus does provide a wide range of controls including several most of its rivals lack, such as highlight and shadow sliders, keystoning adjustments and even per-color sliders for hue, saturation and luminance.


Download the full ACR image here; the full Workspace image here.
Photo by Carey Rose
Modest performance and very buggy GPU processing
Adobe has done an impressive job tuning its algorithms for performance, and like most of its rivals, Olympus Workspace struggles to keep up with Camera Raw. While fast enough to be usable, its previews aren’t real-time and final output takes more than twice as long. Rendering the six-image batch accompanying this article took Camera Raw around 10 seconds, but Workspace needed a full 24 seconds to complete the same task.
But that’s not the full story, because of an issue I quickly discovered with preview rendering. By default, Olympus uses your graphics processor to boost performance, and previews are rendered in two passes — first at a relatively low resolution, and then a higher one.
 |
 |
| Olympus Workspace’s GPU rendering didn’t work well for me. Sometimes previews rendered correctly (above left), but frequently they rendered at low resolution (above right) and stayed that way. And sometimes they rendered at an intermediate — but still rather low — resolution (below). Disabling GPU rendering fixed these issues, but made final output much slower. Click or tap to see full-size images. | |
 |
|
Frequently though, that second pass never completed, even after the hourglass indicating processing was underway had vanished. And sometimes, the final pass rendered at a moderately low resolution instead, while the hourglass symbol sometimes wasn’t shown at all during processing.
Disabling GPU processing fixed all of this for me, and didn’t noticeably slow down image previews. It did, however, make final output *much* slower, more than doubling the processing time for my six-image batch to around 56 seconds. And it’s an either/or choice which requires the program to be entirely restarted, so you can’t easily switch GPU processing on just for the final render but not the previews.
More natural results than Adobe, but highlight/shadow sliders aren’t as useful
In discussing Olympus Workspace’s user interface, I noted that it had a couple of important controls many rivals lack: A pair of sliders for highlight and shadow recovery. They’re intuitive, but unfortunately they’re also not as powerful as those in Adobe Camera Raw.


Download the full ACR image here; the full Workspace image here.
Photo by Carey Rose
Neither could recover as much highlight/shadow detail as could their ACR equivalents, and at the same time, I found they both affected midtones much more. A soft touch is required with both if you want to avoid banding and blocked-up shadows. And recovered shadows also show very muted color, whereas ACR did a much better job of restoring color to those lifted shadow areas.
That being said, I found Olympus Workspace to do a pretty good job with image quality in other respects. To my mind it did a slightly better job than ACR with lens distortion correction, and its images also tended to look more natural, with significantly lower levels of sharpening in particular. Noise reduction levels are higher by default than those used by Adobe, and have a slightly mottled, less film-like look.
Adobe favors a more consumer-friendly, punchy look by default, with significantly higher levels of contrast and saturation, although obviously you can tune this to your tastes if you forego the auto controls. (And with the exception of a handful of tools, Workspace largely doesn’t provide for one-click auto adjustments.)


Download the full ACR image here; the full Workspace image here.
Photo by Carey Rose
Conclusion
More than most of its rivals, Olympus Workspace leaves me feeling somewhat conflicted. Once you’re past the initial learning curve, its interface is clean and approachable, and it offers quite a few handy tools missing from most of the competition. And it’s certainly capable of providing decent image quality, albeit not in the same class as Adobe when it comes to highlight and shadow recovery.
I could certainly see Workspace being a pretty capable companion for your Olympus camera
But performance is a bit of a weak spot that becomes decidedly more of a concern if you need to disable GPU processing, as did I. It’s certainly possible that my significant preview rendering issues when it’s enabled are specific to my chosen graphics card, a 4GB NVIDIA GeForce GTX 1050Ti. The good news is that since the software itself is free, it’s relatively simple for readers to test GPU rendering in their own setup to see if they have any such issues.
If you’re not plagued by the kind of GPU-specific issues that I was, and don’t often find yourself needing to make significant highlight / shadow corrections, I can certainly see Workspace being a pretty capable companion for your Olympus camera, and it’s hard to argue with a price-tag of $0. But if you want the greatest possible scope to correct exposure issues, or you’re beset by problems with preview rendering as I was, you’ll want to give Workspace a miss for the time being.
Leave a Reply

Wildlife Photographer of the Year winners
The 11th annual International Landscape Photographer of the Year competition has announced the winners of its 2024 awards, showcasing stunning imagery from around the world. Photographers competed in various categories, including the coveted Landscape Photographer of the Year, requiring a portfolio of at least four images, and Landscape Photograph of the Year, recognizing the power of a single captivating shot.
This year’s competition saw Canadian photographer Andrew Mielzynski, an amateur with a deep connection to the natural environment, claim the top prize for his portfolio of stark images with simple color palettes. Ryohei Irie from Japan captured the Landscape Photograph of the Year award with a mesmerizing image of fireflies illuminating a forest.
Beyond the overall winners, the competition presented awards in specific categories, including Black and White, Aerial, Snow and Ice, and Forest, along with at-large winners. In addition to the overall and category winners, we’ve included several of our favorite photos from the 202 photographs recognized this year. You can visit the competition’s website to see all the winning images or to download its 2024 eBook.
Landscape Photographer of the Year: 1st place
 |
Photographer: Andrew Mielzynski, Canada
Subject and location: Cono de Arita in the Salar de Arizaro, Atacama Desert in Argentina
Description: The Cono is a perfectly cone-shaped volcano at 3,690 meters above sea level. It’s very graphic due to the contrast between the dark, perfectly formed cone and the bed of white salt that is found at its base.
Copyright Andrew Mielzynski / The International Landscape Photographer of the Year
Landscape Photographer of the Year: 1st place
 |
Photographer: Andrew Mielzynski, Canada
Subject and location: Winter Cottonwoods, Toronto, Ontario, Canada
Description: During the pandemic, I went out for a walk at a local park during a fierce winter storm. I ran across this scene. It seemed very chaotic, with many layers of trees. I loved how the snow, driven by high winds, was embedded into the bark of the trunks. The snow on the bark created a textural contrast that adds detail and interest to the trees. I took a few frames, trying to simplify the scene in front of me and settled on this one, loving the tones, the depth, the order and the minimalism. Even in a chaotic scene, there seems to be a sense of balance that feels orderly and pleasing.
Copyright Andrew Mielzynski / The International Landscape Photographer of the Year
Landscape Photographer of the Year: 1st place
 |
Photographer: Andrew Mielzynski, Canada
Subject and location: Found in a roadside ditch near Heathcote, Ontario, Canada
Description: After a melt, we had a flash freeze with extremely cold temperatures and a clear blue sky. I was driving by a ditch on the side of a road that had been filled with water and had to stop and look (as we photographers do, can’t pass a ditch without investigating). This is what I found. Great textures and patterns, tones and flow, with lovely graphic lines creating a dynamic, abstract designs. I love this type of work – it’s so much fun, yet challenging to find just the right composition.
Copyright Andrew Mielzynski / The International Landscape Photographer of the Year
Landscape Photographer of the Year: 2nd place
 |
Photographer: Ignacio Palacios, Australia
Subject and location: Pumice Field, La Puna, Argentina
Copyright Ignacio Palacios / The International Landscape Photographer of the Year
Landscape Photographer of the Year: 2nd place
 |
Photographer: Ignacio Palacios, Australia
Subject and location: Seven Colors Mountain, Siloli Desert, Bolivian Altiplano
Copyright Ignacio Palacios / The International Landscape Photographer of the Year
Landscape Photographer of the Year: 2nd place
 |
Photographer: Ignacio Palacios, Australia
Subject and location: Arita Cone, La Puna, Argentina
Copyright Ignacio Palacios / The International Landscape Photographer of the Year
Landscape Photographer of the Year: 3rd place
 |
Photographer: Gheorghe Popa, Romania
Subject and location: Early Autumn, Vânători Neamț Natural Park, Romania
Copyright Gheorghe Popa / The International Landscape Photographer of the Year
Landscape Photographer of the Year: 3rd place
 |
Photographer: Gheorghe Popa, Romania
Subject and location: Poisoned Beauty, Geamăna, Apuseni Mountains, Romania
Copyright Gheorghe Popa / The International Landscape Photographer of the Year
Landscape Photographer of the Year: 3rd place
 |
Photographer: Gheorghe Popa, Romania
Subject and location: Whispers of the Sunken Trees Cuejdel Lake, Romania
Copyright Gheorghe Popa / The International Landscape Photographer of the Year
Landscape Photograph of the Year: 1st place
 |
Photographer: Ryohei Irie, Japan
Subject and location: Traces of Light, Ichinomata, Yamaguchi Prefecture, Japan
Description: The Landscape Photograph of the Year Award went to Ryohei Irie of Japan. He likes the mysterious atmosphere created by the standing dead trees and firefly light. “I have been visiting this Subject and location for several years during the firefly season, and it is an interesting place because the intensity and length of the firefly light and the Subject and location where the fireflies fly vary greatly, depending on the year and time of day, resulting in completely different works, even when photographed in the same way.”
Copyright Ryohei Irie / The International Landscape Photographer of the Year
Landscape Photograph of the Year: 2nd place
 |
Photographer: Justinus Sukotjo, Indonesia
Subject and location: Mother Care Framing, Walakiri Beach, Sumba Island, Indonesia
Copyright Justinus Sukotjo / The International Landscape Photographer of the Year
Landscape Photograph of the Year: 3rd place
 |
Photographer: Himadri Bhuyan, India
Subject and location: The Flow, Sohra, Meghalaya, India
Copyright Himadri Bhuyan / The International Landscape Photographer of the Year
The Black and White Award
 |
Photographer: J. Fritz Rumpf, United States
Award: The Black and White Award 2024
Subject and location: White Tie Affair. Death Valley National Park, California, USA
Copyright J. Fritz Rumpf / The International Landscape Photographer of the Year
The Aerial Award
 |
Photographer: Benjamin Barakat, Switzerland
Award: The Aerial Award 2024
Subject and location: The Final Dune, Namibia
Copyright Benjamin Barakat / The International Landscape Photographer of the Year
The Snow and Ice Award
 |
Photographer: Jeroen van Nieuwenhove, Iceland
Award: The Snow and Ice Award 2024
Subject and location: Isþyrlu – Ice Swirl, Scoresbysund, Greenland
Copyright Jeroen van Nieuwenhove / The International Landscape Photographer of the Year
The Forest Award
 |
Photographer: Shirley Wung, Taiwan
Award: The Forest Award 2024
Subject and location: Fireflies flying in the Misty Mountains, Wufeng Township, Hsinchu, Taiwan
Copyright Shirley Wung / The International Landscape Photographer of the Year
The Exciting Sky Award
 |
Photographer: Federico Delucchi, Italy
Award: The Exciting Sky Award 2024
Subject and location: Aurora, meteor shower and other cool stuff, Rocca la Meja, Italy
Copyright Federico Delucchi / The International Landscape Photographer of the Year
Other top entries
 |
Photographer: Laura Bennet, United States
Subject and location: Sumba Island, Indonesia
Copyright Laura Bennet / The International Landscape Photographer of the Year
Other top entries
 |
Photographer: William Preite, Italy
Subject and location: Pale di San Martino, Falcade, Dolomites, Italy
Copyright William Preite / The International Landscape Photographer of the Year
Other top entries
 |
Photographer: Siegfried Makedanz, Germany
Subject and location: Sandfellsjökull Glacier Lagoon, Southern Iceland
Copyright Siegfried Makedanz / The International Landscape Photographer of the Year
Other top entries
 |
Photographer: Sabine Weise, Germany
Subject and location: Moonscape Overlook, Utah Badlands, USA
Copyright Sabine Weise / The International Landscape Photographer of the Year
Other top entries
 |
Photographer: Yuriy Vantowski, United States
Subject and location: Mount Bromo, East Java, Indonesia
Copyright Yuriy Vantowski / The International Landscape Photographer of the Year
Other top entries
 |
Photographer: Tanay Das, India
Subject and location: Kistwa, Himalaya, Jammu and Kashmir, India
Copyright Tanay Das / The International Landscape Photographer of the Year
Other top entries
 |
Photographer: Rajesh Jyothiswaran, United States
Subject and location: Texas, United States
Copyright Rajesh Jyothiswaran / The International Landscape Photographer of the Year

| Images: Canon, Nikon |
It wasn’t long ago that many of our reviews of APS-C cameras had to come with a warning: no matter how good the body was, you were almost certainly going to be limited by lens selection. This was especially true with Nikon and Canon’s mirrorless cameras. Sony has followed its longstanding tradition of letting third parties build out a healthy selection of lenses, and the selection for Fujifilm’s APS-C-only X-mount is second to none, but Nikon’s Z mount and Canon’s RF mount appeared to be almost completely locked down. As a result, you could count the number of APS-C lens options available on your fingers.
But things are changing. Over the past year, we’ve seen several APS-C lenses announced and released for Canon and Nikon cameras, filling notable gaps in the first-party lens lineups. But while the situation is improving, it’s clear that the two companies are still in control.
This week, Sigma released four APS-C primes for Canon’s RF mount, making good on its promise to release six licensed lenses for the system – earlier this year, it released the 10-18mm F2.8 and 18-50mm F2.8. Meanwhile, Nikon has allowed Sigma to release select primes for Z-mount – a trio of F1.4 primes at 16, 30, and 56mm. It’s worth noting the company’s 23mm F1.4 is the only one of its APS-C primes that it hasn’t brought to Z-mount; it likely isn’t a coincidence that Nikon’s only first-party APS-C prime lens is a 24mm F1.7.
 |
|
Sigma’s APS-C prime lens lineup is quite good, and now most of them are available for almost any mirrorless APS-C camera.
Image: Sigma |
However, Nikon hasn’t stopped companies like Viltrox and Sirui from releasing a slew of Z-mount APS-C prime lenses, complete with autofocus. If you pick up a Nikon Zfc or Z50II, you can get anywhere from a 13mm F1.4 (20mm equiv.) to a 75mm F1.2 (113mm equiv.) to go with it, as well as most of the classic focal lengths in between.
Your choices are no longer limited to a few first-party options, manual-focus only lenses, or glass meant for full-frame bodies
This is an important change for APS-C shooters. Even going back to the DSLR days, it’s felt like many manufacturers have viewed the format as a stepping stone to full-frame rather than something enthusiasts and pros might consciously choose. Neither Canon nor Nikon have been particularly prolific when releasing new APS-C glass. But with the gates being slightly opened, you’re no longer limited to a few first-party options, manual-focus-only lenses from third parties, or heavier, more expensive full-frame lenses. Now, there’s at least some selection of third-party lenses with autofocus to choose from, alongside Canon and Nikon’s offerings.
This isn’t to say that you can now buy any APS-C camera you want and be assured that all the lenses you want will be available – you are still at the mercy of what Canon and Nikon wish to allow. While plenty of primes are available for Z-mount APS-C cameras, no fast zoom lenses are available; Nikon’s all start at F3.5 and end at F5.6 or F6.3.
In fact, there are currently no third-party APS-C zooms available for Nikon Z-mount at all, despite the fact that two have made the jump from E and X-mount to RF – it also goes without saying that there are many others more available on Fujifilm and Sony’s systems. That’s a bummer for anyone looking to step up from the kit lens or wanting to shoot sports or birds in anything but ideal lighting without having to shell out for and lug around a full-frame 70-200mm.
 |
|
Tamron has promised to bring its 11-20mm F2.8 APS-C lens to Canon RF mount this year as well – no word on Z-mount, despite Tamron bringing some of its full-frame lenses to Nikon.
Image: Tamron |
RF mount at least has the two constant F2.8 zooms thanks to Sigma, with one more on the way from Tamron, though those are all at the wide end. However, there are far fewer autofocus primes available for Canon, as manufacturers like Sirui and Viltrox aren’t producing them. That’s not surprising; a representative for the latter once said that Canon had told it to stop producing products for RF mount. The 85mm F1.4 lens that Samyang announced for the system in 2020 also disappeared from the market not long after.
In a perfect world, these problems wouldn’t exist. Canon and Nikon would make the lenses that their APS-C cameras needed to stand on their own feet as a real alternative to full-frame options, and there would be robust competition from third parties, which would be allowed to make whatever lenses they want.
None of that seems particularly likely. However, at least those who choose to shoot with a smaller sensor in a Canon or Nikon body have gotten a wider choice of lenses, even if they’re still bound by the companies’ rules.
At the end of the day, that’s better for everyone interested in APS-C, because it means that cameras like the EOS R7 and Z50II are competitive with the Sony a6700 and Fujifilm X-T5 in a way that they wouldn’t have been with an extremely limited lens selection. With any luck, this trend will continue, and the APS-C landscape will become more competitive – even if Canon and Nikon aren’t giving it their full attention.

|
The FE 28-70mm F2.8 GM, attached to the newly-announced a1 II.
Photo: Mitchell Clark |
Sony has announced the FE 28-70mm F2 GM, a zoom lens that trades 4mm at the wide end for an aperture that’s a stop brighter than the one found on a classic 24-70mm F2.8. It’s the company’s first constant F2 zoom lens for its E-mount cameras.
The lens’s optical formula consists of 20 elements in 14 groups, with three aspherical lenses, three super ED elements, and one ED element. It uses an 11-blade aperture. The front element has an oil and water-resistant flourine coating, and the lens is moisture and dust resistant.
It’s far from a compact lens, though it’s not as monstrously large as you might expect – it weighs in at 918g (32 oz) and is around 140mm (5.5″) long. It has an 86mm filter thread.
Sony makes it obvious what lens it’s competing with; highlighting that it’s 36% lighter and 11% smaller in diameter than Canon’s RF 28-70mm F2 L lens while claiming better corner-to-corner sharpness. The company also says the lens’s four linear motors can focus even when shooting at 120fps, and emphasized that they’re quieter than the older ring-type ultrasonic style motor in the Canon F2. In fairness, that lens was one of the original RF-mount releases, announced in 2018.
“Sony makes it obvious which lens it’s competing with”
The quieter operation should help when shooting video. Other pluses for video: it has an internal focusing mechanism which should make it easier to use the lens on a gimbal, the ability to switch the aperture ring into clickless mode and supports the focus breathing compensation mode included on some Sony bodies. You can also set the manual focus ring to have a linear response, which should make focus pulls easier.
The lens has a variety of switches and buttons. There are two customizable focus hold buttons, an Iris lock switch, the aperture click switch and a zoom smoothness switch that lets you adjust between “smooth” and “tight” torque settings.
It’s not the fastest zoom lens available for E-mount: at the time of writing, that prize goes to Sigma’s 28-45mm F1.8, though that model has substantially less reach on the tele end and only a 1/3EV increase in light-gathering ability.
The FE 28-70mm F2 GM will be available in mid-December and has an MSRP of $2,899.
Sony Electronics Announces Its First Constant F2 Aperture Zoom Lens: The Full-Frame 28-70mm F2 G Master™
The Unique Combination of a Versatile Focal Range, Large F2 Aperture, and Compact Form Factor
SAN DIEGO, Nov. 19, 2024 – Sony Electronics Inc. introduces the 28-70mm F2 G Master, the first1 Sony zoom lens with a constant F2 aperture and 77th lens in the Sony E-Mount lineup. This full-frame lens offers a versatile focal range from 28mm to 70mm while delivering prime-like2 bokeh with its constant F2 aperture. Despite its wide aperture and zoom range, the 28-70mm F2 G Master remains compact, lightweight, and well-balanced, making it ideal for both photography and video applications. This combination of zoom range, large aperture, and compact design makes this an innovative and versatile lens for portrait, sports, wedding, event, and video professionals.
“Our goal with the 28-70mm F2 G Master was to create a high-performing zoom lens that could be a strong single lens alternative to multiple primes,” said Yang Cheng, Vice President of Imaging Solutions, Sony Electronics Inc. “We prioritized a lightweight design during the engineering process as we knew that was a critical factor for real-life, practical use. And in a manner that only Sony can do, we were able to deliver a small, standard F2 zoom lens that does not sacrifice image quality. We’re proud to add this to our G Master series and believe it is one of the most innovative lenses ever offered to professionals.”
Sharp Imagery and Beautiful Bokeh
The 28-70mm F2 G Master produces extremely sharp corner-to-corner results throughout the entire zoom range, even while shooting wide open at F2. The high-resolution output is made possible by the three XA (extreme aspherical) elements and three aspherical elements built within the lens that minimize aberrations. The lens also features a floating focusing system that helps maintain internal stability. This focusing mechanism enables an impressive minimum focusing distance of up to 14.8 inches (0.38m) throughout the entire zoom range.
Staying true to the G Master lens lineage, the lens’ aperture up to F2 produces extraordinary bokeh, ideal for creating images that showcase a shallow depth of field. The 28-70mm F2 amplifies the G Master bokeh standards through a newly designed 11-blade circular aperture unit. Chromatic aberrations, which cause color fringing within photos, are effectively minimized with three Super ED (extra-low dispersion) elements and one ED element built within the lens. Additionally, Sony’s Nano AR Coating II reduces flare and internal reflections, ensuring clear images, even when strong light sources are present in the frame.
Compact, Lightweight Design Without Compromising Quality
The 28-70mm F2 G Master is one of the most advanced mirrorless camera lenses manufactured with a total 20 different lens elements arranged within 14 internal groups. Despite the advanced optical design, the lens remains compact at 3.6 x 5.5 inches (92.9 x 139.8mm) and lightweight at approximately 32.3 ounces (918g). The combination of imaging performance and a compact form factor offers an innovative solution that meets the demands of industry professionals.
Precise Autofocus Tracking with Instant Response
Reliable and responsive autofocus is delivered through the lens’ four XD (extreme dynamic) linear motors powered by advanced control algorithms. This smooth performance system provides accurate and quick focus tracking, often essential in many professional use cases like weddings and sports. This lens is fully compatible with Sony’s Alpha 9 III‘s high-speed continuous shooting capabilities of up to 120 frames per second3 with AF/AE (autofocus/autoexposure) tracking, even while zooming.
Designed for High-Performance Video Shooting
Along with its F2 aperture, the zoom range of the 28-70mm G Master provides a versatile video option that can cover standard field-of-view shots and tighter compositions up to 70mm. This lens minimizes focus breathing through its build and compatibility with the Breathing Compensation feature on various Alpha bodies4. Its high autofocus performance ensures reliable focus even when recording in high frame rates up to 4K 120p / FHD 240p5. Additionally, the XD linear motors and newly developed aperture unit operates silently, preventing any lens noise from being captured during filming.
The lens is ideal for gimbal use with a minimal zoom extension of approximately .68 inches. The compact form factor and short external zoom helps maintain gimbal balance, even at varying focal lengths.
Operability and Reliability for Versatile Control
Key control features include Linear Response MF for intuitive manual focusing, adjustable zoom ring torque, and an aperture ring with a click ON/OFF switch. The lens also offers two customizable focus hold buttons, an iris lock switch, and an AF/MF switch. The 28-70mm F2 G Master has an 86mm filter diameter and a convenient window on the lens hood for variable filter adjustments.
For durability, all buttons and switches are sealed with silicone gaskets, and critical areas are designed to resist dust and moisture6. This ensures reliability, even while using in challenging outdoor environments. Additionally, a fluorine coating on the front element repels contaminants for easy cleaning.
Pricing and Availability
The 28-70mm F2 G Master will be available in December 2024 for approximately $2,899.99 USD and $3,999.99 CAD. It will be sold at a variety of Sony’s authorized dealers throughout North America.
A product video on the new 28-70mm F2 G Master can be viewed here: https://youtu.be/7Y_O5YYQIl0
For detailed product information about the 28-70mm F2 G Master, please visit: https://electronics.sony.com/imaging/lenses/full-frame-e-mount/p/sel2870gm
Exclusive stories and exciting new content shot with the new 28-70mm F2 G Master and Sony’s other imaging products can be found at www.alphauniverse.com, a site created to inform, educate, and inspire content creators.
Sony FE 28-70mm F2 GM Specifications
| Principal specifications | |
|---|---|
| Lens type | Zoom lens |
| Max Format size | 35mm FF |
| Focal length | 28–70 mm |
| Image stabilization | No |
| Lens mount | Sony E, Sony FE |
| Aperture | |
| Maximum aperture | F2–20 |
| Minimum aperture | F2–20 |
| Aperture ring | Yes |
| Number of diaphragm blades | 11 |
| Optics | |
| Elements | 20 |
| Groups | 14 |
| Special elements / coatings | 3 aspherical, 3 super ED, 1 ED |
| Focus | |
| Minimum focus | 0.38 m (14.96″) |
| Maximum magnification | 0.23× |
| Autofocus | Yes |
| Motor type | Linear Motor |
| Focus method | Internal |
| Distance scale | No |
| DoF scale | No |
| Physical | |
| Weight | 918 g (2.02 lb) |
| Diameter | 93 mm (3.66″) |
| Length | 140 mm (5.51″) |
| Sealing | Yes |
| Colour | Black |
| Filter thread | 86 mm |
| Hood supplied | Yes |
-

 Solar Energy3 years ago
DLR testing the use of molten salt in a solar power plant in Portugal
-
world news1 year ago
Gulf, France aid Gaza, Russia evacuates citizens
-

 Camera1 year ago
DJI Air 3 vs. Mini 4 Pro: which compact drone is best?
-
world news1 year ago
Strong majority of Americans support Israel-Hamas hostage deal
-

 Camera4 years ago
Charles ‘Chuck’ Geschke, co-founder of Adobe and inventor of the PDF, dies at 81
-

 Solar Energy12 months ago
Glencore eyes options on battery recycling project
-

 Camera1 year ago
Sony a9 III: what you need to know
-

 TOP SCEINCE7 months ago
Can animals count?


Pingback: Field review: Sigma 28-70mm F2.8 DG DN | godsownmedia
Pingback: Adobe Camera Raw vs. Capture One Express Fujifilm: A worthy free contender