Camera
Adobe Camera Raw vs. Olympus Workspace: Which app should you use?

Did you receive a brand-new Olympus camera over the holidays? If so, chances are good that the next addition to your photographic toolbox will be a Raw processor from the likes of Adobe, Capture One, DxO or one of their many rivals. But is payware or even subscriptionware software really necessary, when Olympus provides its own software free of charge with your camera purchase?
| Olympus Workspace version 1.4’s user interface. |
In this article, we’ll compare the company’s Olympus Workspace Raw processing application with its well-entrenched payware rival, Adobe Camera Raw, whose algorithms also underlie the company’s popular Lightroom Classic application. As in previous articles in this series, I’m limiting myself only to image editing in the interests of keeping things to a readable length, and won’t address features like image management, tethering or printing.
The ground rules
This comparison is based upon the most recent versions of each application at the time of writing. For Adobe, that’s Camera Raw 13.1.1 and Bridge 11.0. For Olympus, it’s Workspace 1.4. My computer is a 2018 Dell XPS 15 9570 laptop running Windows 10 version 1909.
To ensure neither Adobe nor Olympus had any advantage out of the gate, I’ve aimed to reproduce, as closely as possible, the look of already-processed images from our galleries, without any prior knowledge as to the recipes behind them.
 |
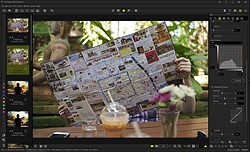
| Adobe Camera Raw version 13.1.1’s user interface. |
I’ve chosen images from the Olympus E-M1 Mark II for use in this comparison, as it was the most recent model for which we had sufficient comparison images already prepared, and its launch price and resolution are broadly similar to those of the cameras used in my previous manufacturer software comparisons.
Sharpness and noise reduction were left at their default settings to avoid overcomplicating things, while lens corrections were enabled for both applications. Images processed in ACR were saved at JPEG quality 11, just as used in our galleries. For Olympus Workspace, which offers a choice of just three different compression levels, I used the maximum ‘Super Fine’ quality.
The main differences
Of course, the most immediately obvious differences between ACR and Olympus Workspace are their camera support and price-tag. You already paid for Workspace when you bought your Olympus camera, so it’s effectively free. While it only supports Raws shot by the company’s own cameras, you can expect full Raw support for every Olympus camera to be available pretty much immediately upon release.


Download the full ACR image here; the full Workspace image here.
Photo by Carey Rose
By contrast, ACR comes with a recurring subscription fee. It supports a vast range of cameras from many manufacturers, including every single interchangeable-lens Olympus camera made to date, as well as many fixed lens models. If your camera supports Raw capture, ACR can almost certainly handle it, but that support can sometimes take a while to arrive after the release of new models. It’s also more limited sometimes than first-party software, especially for older models.
For example, while Adobe offers ‘camera matching’ profiles for all of Olympus’ Micro Four Thirds ILCs and Stylus compacts, it’s not available for any of the company’s Four Thirds DSLRs except the E-5. Nor is it provided for Camedia, SP- or XZ-series fixed-lens cameras.
A clean, modern interface and database storage of edits
Olympus Workspace is a relatively new offering that first launched in early 2019 alongside the sports-oriented E-M1X, so it’s perhaps not surprising that it’s pretty clean and modern, aesthetically speaking. And unlike some rivals, it doesn’t make the mistake of storing your edits in your original files, nor does it scatter sidecar files all over your drives. Instead, all edits are stored in a single database whose location you can control.


Download the full ACR image here; the full Workspace image here.
Photo by Carey Rose
Workspace has a non-modal design and is pretty customizable in terms of its layout, which is liberally sprinkled with unlabeled icons. For most the meaning is obvious, but some are a bit opaque, although a description is usually shown if you hover the mouse pointer above them. There’s also an excellent, in-depth PDF user manual linked from the Help menu.
High-res 4K screens, touchscreens and pens work well for the most part, though there are quirks
You can’t directly edit Workspace’s keyboard shortcuts, but you can choose from a few different preconfigured shortcut groups for some of the more commonly-used options. Most editing controls are grouped in an editing palette that, by default, sits at the right of the screen. It has a tabbed design and individual sections under each tab can be opened or closed at once. If you leave many open together, though, you can find yourself doing a lot of scrolling in search of controls.
Multiple monitors are supported, allowing you to view your image full-screen on one monitor while adjusting controls or browsing thumbnails on the other. You can also compare and edit two different images side-by-side, a feature most competitors lack. High-res 4K screens, touch-screens / pens also work well for the most part, although there are some quirks.


Download the full ACR image here; the full Workspace image here.
Photo by Carey Rose
The UI can sometimes prove rather quirky, though
If you have multiple displays of differing resolution and you drag panels between them, the correct per-screen scaling factor is forgotten and the panels can be unusably large or small. And adjusting sliders is easier with a mouse instead of touch or pen input, because you have to double-tap on the slider with a pen or your fingertip before you can make your adjustment.
In most apps, if an adjustment isn’t available you’d expect it to be grayed out, but Workspace doesn’t do so
Nor are those the only strange UI choices. For example, preset white balance can be adjusted on a magenta-green axis with a fixed step size, yet auto white balance is instead adjusted on a green-magenta axis and its slider moves smoothly, rather than in steps. Yet even though it moves smoothly, positions in between the steps don’t affect the white balance at all, meaning you can have two images with seemingly different adjustments that are nevertheless 100% identical.
Even more confusingly, the contrast slider might have absolutely zero effect if the Gradation control is active and set to anything other than normal gradation. In most apps, if an adjustment isn’t available you’d expect it to be grayed out, but not in Workspace. With all of that said, Olympus does provide a wide range of controls including several most of its rivals lack, such as highlight and shadow sliders, keystoning adjustments and even per-color sliders for hue, saturation and luminance.


Download the full ACR image here; the full Workspace image here.
Photo by Carey Rose
Modest performance and very buggy GPU processing
Adobe has done an impressive job tuning its algorithms for performance, and like most of its rivals, Olympus Workspace struggles to keep up with Camera Raw. While fast enough to be usable, its previews aren’t real-time and final output takes more than twice as long. Rendering the six-image batch accompanying this article took Camera Raw around 10 seconds, but Workspace needed a full 24 seconds to complete the same task.
But that’s not the full story, because of an issue I quickly discovered with preview rendering. By default, Olympus uses your graphics processor to boost performance, and previews are rendered in two passes — first at a relatively low resolution, and then a higher one.
 |
 |
| Olympus Workspace’s GPU rendering didn’t work well for me. Sometimes previews rendered correctly (above left), but frequently they rendered at low resolution (above right) and stayed that way. And sometimes they rendered at an intermediate — but still rather low — resolution (below). Disabling GPU rendering fixed these issues, but made final output much slower. Click or tap to see full-size images. | |
 |
|
Frequently though, that second pass never completed, even after the hourglass indicating processing was underway had vanished. And sometimes, the final pass rendered at a moderately low resolution instead, while the hourglass symbol sometimes wasn’t shown at all during processing.
Disabling GPU processing fixed all of this for me, and didn’t noticeably slow down image previews. It did, however, make final output *much* slower, more than doubling the processing time for my six-image batch to around 56 seconds. And it’s an either/or choice which requires the program to be entirely restarted, so you can’t easily switch GPU processing on just for the final render but not the previews.
More natural results than Adobe, but highlight/shadow sliders aren’t as useful
In discussing Olympus Workspace’s user interface, I noted that it had a couple of important controls many rivals lack: A pair of sliders for highlight and shadow recovery. They’re intuitive, but unfortunately they’re also not as powerful as those in Adobe Camera Raw.


Download the full ACR image here; the full Workspace image here.
Photo by Carey Rose
Neither could recover as much highlight/shadow detail as could their ACR equivalents, and at the same time, I found they both affected midtones much more. A soft touch is required with both if you want to avoid banding and blocked-up shadows. And recovered shadows also show very muted color, whereas ACR did a much better job of restoring color to those lifted shadow areas.
That being said, I found Olympus Workspace to do a pretty good job with image quality in other respects. To my mind it did a slightly better job than ACR with lens distortion correction, and its images also tended to look more natural, with significantly lower levels of sharpening in particular. Noise reduction levels are higher by default than those used by Adobe, and have a slightly mottled, less film-like look.
Adobe favors a more consumer-friendly, punchy look by default, with significantly higher levels of contrast and saturation, although obviously you can tune this to your tastes if you forego the auto controls. (And with the exception of a handful of tools, Workspace largely doesn’t provide for one-click auto adjustments.)


Download the full ACR image here; the full Workspace image here.
Photo by Carey Rose
Conclusion
More than most of its rivals, Olympus Workspace leaves me feeling somewhat conflicted. Once you’re past the initial learning curve, its interface is clean and approachable, and it offers quite a few handy tools missing from most of the competition. And it’s certainly capable of providing decent image quality, albeit not in the same class as Adobe when it comes to highlight and shadow recovery.
I could certainly see Workspace being a pretty capable companion for your Olympus camera
But performance is a bit of a weak spot that becomes decidedly more of a concern if you need to disable GPU processing, as did I. It’s certainly possible that my significant preview rendering issues when it’s enabled are specific to my chosen graphics card, a 4GB NVIDIA GeForce GTX 1050Ti. The good news is that since the software itself is free, it’s relatively simple for readers to test GPU rendering in their own setup to see if they have any such issues.
If you’re not plagued by the kind of GPU-specific issues that I was, and don’t often find yourself needing to make significant highlight / shadow corrections, I can certainly see Workspace being a pretty capable companion for your Olympus camera, and it’s hard to argue with a price-tag of $0. But if you want the greatest possible scope to correct exposure issues, or you’re beset by problems with preview rendering as I was, you’ll want to give Workspace a miss for the time being.
Leave a Reply
Camera
Pentax K-1 and K-1 II firmware updates include astrophotography features (depending on where you live)
")
Yesterday, Ricoh quietly released firmware 2.50 for its Pentax K-1 and K-1 II DSLRs. However, the features you can expect to gain from this update may depend on your geography.
Ricoh’s English-language firmware pages for the K-1 and K-1 II state that firmware 2.50 delivers “Improved stability for general performance.”
However, astute Pentax users noted that Ricoh’s Japanese-language firmware pages (translation) indicate that the update also includes a limited feature called “Astronomical Photo Assist,” a collection of three new features designed for astrophotography: Star AF, remote control focus fine adjustment, and astronomical image processing.
Star AF is intended to automate focusing on stars when using autofocus lenses. Rather than manually focusing on a bright star and changing your composition, it promises to let you compose your shot and let the camera focus.
Remote control fine adjustment allows users to adjust focus without touching the lens and requires Pentax’s optional O-RC1 remote. Astronomical image processing will enable users to make in-camera adjustments to astrophotography images, including shading correction, fogging correction, background darkness, star brightness, celestial clarity, and fringe correction.
 |
| Astronomical image processing on the K-1 and K-1 II will enable users to make in-camera adjustments to astrophotography images, including shading correction, fogging correction, background darkness, star brightness, celestial clarity, and fringe correction. |
According to Ricoh, Astronomical Photo Assist is a premium feature that must be purchased and costs ¥11,000 for an activation key (about $70 at current exchange rates).
Although these astrophotography features appear to be Japan-only for now, a Ricoh representative tells us, “Ricoh Imaging Americas confirmed that the premium firmware features for the PENTAX K-1 and PENTAX K-1 Mark II will eventually be available to US customers.”
Firmware update 2.50 for both the K-1 and K-1 II is available for download from Ricoh’s website.

As part of our twenty fifth anniversary, we’re looking back at some of the most significant cameras launched and reviewed during that period. Today’s pick was launched seven years ago today* and yet we’re only quite recently stepping out of its shadow.
The Nikon D850 is likely to be remembered as the high watermark of DSLR technology. We may yet still see impressive developments from Ricoh in the future (we’d love to see a significantly upgraded Pentax K-1 III), but the D850 was perhaps the green flash as the sun set on the DSLR as the dominant technology in the market.
Click here to read our Nikon D850 review
Why do we think it was such a big deal? Because it got just about everything right. Its 45MP sensor brought dual conversion gain to high pixel count sensors, meaning excellent dynamic range at base ISO and lower noise at high ISOs. Its autofocus system was one of the best we’ve ever seen on a DSLR: easy to use and highly dependable, with a good level of coverage. And then there was a body and user interface honed by years of iterative refinement, that made it easy to get the most out of the camera.
None of this is meant as a slight towards the other late-period DSLRs but the likes of Canon’s EOS 5DS and 5DSR didn’t present quite such a complete package of AF tracking, daylight DR and low-light quality as the Nikon did. With its ability to shoot at up to 9fps (if you used the optional battery grip), the D850 started to chip away at the idea that high megapixel cameras were specialized landscape and studio tools that would struggle with movement or less-than-perfect lighting. And that’s without even considering its 4K video capabilities.
In the seven years since the D850 was launched, mirrorless cameras have eclipsed most areas in which DSLRs once held the advantage. For example, the Z8 can shoot faster, autofocus more with more accuracy and precision, across a wider area of the frame and do so while shooting at much faster rates.
But, even though it outshines the D850 in most regards, the Z8 is still based around what we believe is a (significant) evolution of the same sensor, and its reputation still looms large enough for Nikon to explicitly market the Z8 as its “true successor.”
Nikon D850 sample gallery
*Actually seven years ago yesterday: we had to delay this article for a day to focus on the publishing the Z6III studio scene: the latest cameras taking precedence over our anniversary content.

| Photo: Richard Butler |
We’ve just received a production Nikon Z6III and took it into our studio immediately to get a sense for how the sensor really performs.
Dynamic range tests have already been conducted, but these only give a limited insight into the image quality as a whole. As expected, our Exposure Latitude test – which mimics the effect of reducing exposure to capture a bright sunrise or sunset, then making use of the deep shadows – shows a difference if you use the very deepest shadows, just as the numerical DR tests imply.
Likewise, our ISO Invariance test shows there’s more of a benefit to be had from applying more amplification by raising the ISO setting to overcome the read noise, than there was in the Z6 II. This means there’s a bigger improvement when you move up to the higher gain step of the dual conversion gain sensor but, as with the Z6 II, little more to be gained beyond that.
These are pushing at the extreme of the sensor’s performance though. For most everyday photography, you don’t use the deepest shadows of the Raw files, so differences in read noise between sensors don’t play much of a role. In most of the tones of an image, sensor size plays a huge role, along with any (pretty rare) differences in light capturing efficiency.
As expected, the standard exposures look identical to those of the Z6 II. There are similar (or better) levels of detail at low ISO, in both JPEG and Raw. At higher ISO, the Z6III still looks essentially the same as the Z6II. Its fractionally higher level of read noise finally comes back to have an impact at very, very high ISO settings.
Overall, then, there is a read noise price to be paid for the camera’s faster sensor, in a way that slightly blunts the ultimate flexibility of the Raw files at low ISO and that results in fractionally more noise at ultra-high ISOs. But we suspect most people will more than happily pay this small price in return for a big boost in performance.
-

 Solar Energy3 years ago
DLR testing the use of molten salt in a solar power plant in Portugal
-

 Camera3 years ago
Charles ‘Chuck’ Geschke, co-founder of Adobe and inventor of the PDF, dies at 81
-
world news8 months ago
Gulf, France aid Gaza, Russia evacuates citizens
-
world news3 months ago
Jewish diaspora expresses concern as Iranian drones launch toward Israel
-

 Camera3 years ago
80,000MP panoramas: EarthCam announces world’s highest-resolution robotic webcam
-

 TOP SCEINCE3 months ago
Can animals count?
-

 Solar Energy8 months ago
Glencore eyes options on battery recycling project
-

 Camera8 months ago
DJI Air 3 vs. Mini 4 Pro: which compact drone is best?


Pingback: Field review: Sigma 28-70mm F2.8 DG DN | godsownmedia
Pingback: Adobe Camera Raw vs. Capture One Express Fujifilm: A worthy free contender